Transform your graphical site designs into fully-fledged web templates

The purpose of this tutorial is to transform a Photoshop document into a working web interface. We are going to focus on exporting ready-made imagery and working it into a structured HTML document with additional CSS styling. Photoshop plays a very important role in web design and is favoured by most web designers. Although with CSS3 now in the mix people are under the assumption that we don‘t need to rely on Photoshop as much as we did in the past, this is not the case since CSS3 is not fully supported in all browsers as of yet, which means we won‘t be putting Photoshop to bed for a while. It will have its role in web design for a long time to come as it is such a great tool for creating graphics. The more con ident you become at transforming your Photoshop documents to HTML the easier you’ll ind it and realise the two go hand-in-hand in the world of web design.
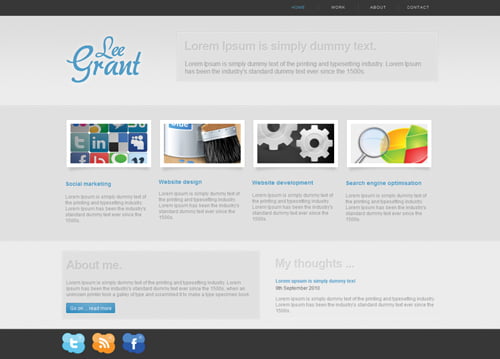
Author: Lee Grant | Tutorial Files
01. Getting started

To start you’re going to need to create a new folder and give it a name, something like ‘website’ will do. Now inside this folder create two more, named ‘images’ and ‘css’. This is where you will be saving all of your files and assets which you will eventually create from this tutorial.
02. Cut the logo

Open up your Photoshop document and set each group and any layers not contained in a group to invisible by clicking the eye icon beside the layer. Be sure to leave the ‘logo’ group visible. Click Image>Trim then trim away any transparent pixels and save your image as logo.png to your images directory.
03. Background image

The next step will be to crop the background image down to size, so set all groups to invisible (done using the eye icon which can be found next to the folder) except the background image. You then need to crop from the top of the page to about 300 pixels down and roughly 10-15 pixels wide, and then save this as a .png.
04. Some XHTML
Now you have the structure for your folders set up, move on to some xhtml to prepare the header section so you can place your images in once ready. So next open up Dreamweaver (or your favourite text editor) and copy the following code into a new index. html and save this to your ‘website’ directory. The full code for this step can be found on the disc.
<!DOCTYPE html PUBLIC “-//W3C//DTD XHTML 1.0 Strict//EN”
“http://www.w3.org/TR/xhtml1/DTD/xhtml1- strict.dtd”>
<html xmlns=”http://www.w3.org/1999/xhtml”>
<head>
<meta http-equiv=”Content-Type”content=”text/html; charset=utf-8” />
<link rel=”stylesheet” href=”css/style.css” media=”all” />
<title>PSD to XHTML</title>
05. Welcome box image

Back in Photoshop, extend your ‘welcome box’ layer by clicking the arrow icon, you need to set the dummy paragraph to invisible by clicking the eye icon. Now crop from the top left all the way to the right and leave about 5px from the bottom and save this image as welcome-bg.png.
06. Welcome box small image

Follow the same process as step five, but this time you will need to crop from the bottom of your welcome box upwards. So select the Crop tool and crop from the bottom of the box up to around four or five pixels high. You can then save this image as welcomebg- bottom.png.
07. Let’s style
The markup and images are all set up now for the heading section of the page so all you need to do is add some styling to add some colour and position your elements properly. Open up Dreamweaver and create a new .css file and insert the following code (which is included in full on the disc). Once done save the file as ‘style.css’ and place it in the ‘css’ folder.
body { margin:0; padding:0; font-family:
Arial, Helvetica, sans-serif;
font size:12px;
color:#959595;
background: #ececec url(../ images/bg.png) repeat-x; }
/***** NAVIGATION *****/
#nav_container { backgroundcolor:#373737;
width:100%; }
#nav { width:950px;
height:40px;
08. More html
Next you need to add some more html to the index.html document, this will essentially place all of the different elements on the page to which you will then
need to slice up your thumbnails in Photoshop and add CSS styles to position the new divs. The full code for this step is included on the disc.
<div id=”services_holder”>
<div id=”services”>
<div class=”services-block”>
<img src=”images/social.png”alt=” Socialmarketing” />
<h2><a href=”#”>Social marketing</a></h2>
<p>Lorem Ipsum is simply dummy text of the printing and typesetting industry. Lorem Ipsum has been the industry’s
09. Slicing the thumbnails

Open up your Photoshop document again and select the Crop tool. You now need to crop down the first thumbnail image being extra careful to not crop out any of the drop shadow, so it is best to allow roughly five pixels around the edges and considerably more at the bottom.
10. Service block styling
With all of your images and markup in place, the page isn’t much to look at. You can fix all of this with the help of some CSS. You can float each containing div to the left which will position your divs side-by-side. Full code for this step can be found on the disc.
/***** ABOUT *****/
#about_container { background:#ececec url(../images/about-line.png) repeat-x; ~
width:100%;
padding-bottom:25px; }
#about { width:950px;
margin:0 auto;
padding:25px 0 0 0; }
#about_me_box { width:479px;
background:#000 url(../images/aboutbg.png);
padding:60px 10px 0 10px;
float:left;
position: relative; }
11. HTML divs
Again you can insert your markup into your html document with all of your image tags in place ready to crop down the images afterwards. Notice that
we use empty divs with the class “clear” in our markup, these are essential as they play a part in keeping divs in position.
<div id=”about_container”>
<div id=”about”>
<div id=”about_me_box”>
<p>Lorem Ipsum is simply dummy text of
the printing and typesetting industry.
Lorem Ipsum has been the industry’s
standard dummytext ever since the 1500s,
when an unknown printer took a galley of
type and scrambled it to make a type
specimen book.</p>
<p><span><a href=”#”>Go on … read more</
a></span></p>
<img src=”images/about-bg-bottom.png”
alt=”About bottom” /> </div>
<div id=”blog”>
<img src=”images/thoughts.png” alt=”My
thoughts” />
12. About box background

You can use the same technique here as you did for cropping the background for the welcome box. Switch over to Photoshop and select the “About me
box” group, crop from the top left to five pixels from the bottom, save this image then hold Ctrl/Cmd+Z to go back, this time crop the bottom of the image and save as a new image.
13. Blue button
For the button you need to create two images, so in Photoshop hide the layer over the button which contains text. Crop from the left of the button to the
right, leaving about ten pixels to the right. Save this image and press Ctrl/Cmd+Z to undo, and crop from the right to the left leaving ten pixels and save this image.
14. Blog title image

You have a little bit more cropping to do before you can close up the Photoshop document. In Photoshop select Crop from the Tools palette, and crop
out the text which says “My thoughts…” and save this to the images folder as thoughts.png.
15. Social networking buttons

All you have left now is to crop the social networking buttons and you’re all done, so select the Crop tool again and crop around each of the buttons
individually and save them to the images folder.
You can see in the illustration how to do this.
- How to Monetize Your Facebook Page: A Comprehensive Guide - July 22, 2023
- Avoiding Plagiarism: Your Ticket to Originality and Academic Success! - July 21, 2023
- Chat-GPT: Your Friendly AI Pal for Awesome Conversations! - July 20, 2023
Nice one for publishing Convert Photoshop themes into HTML pages . I actually loved it and I really don’t usually comment although this particular post influenced me to do so. I did realize that this post gave the impression to be a bit rushed when compared with your normal clever layout of the previous posts. Only my two cents… Camilla Renna 😉
To: Website Owner! I like your WordPress site and I found your page thru Google so I thought you could make some money off of this. There is a WordPress SEO addon that does automated SEO for your website, automated SEO add-ons like this are brand new to the online blog scene so owning this would give your page a huge boost in visitors. If you are serious about making your blog grow and make money then check it out @ http://tiny.cc/qx8tp. Later, keep up the good work.
We’re a group of volunteers and starting a new scheme in our community. Your website provided us with valuable info to work on. You have done an impressive job and our whole community will be thankful to you.
Hiya, Amazing Blog article! I have just retweeted this content to my fans.
Many thanks for everything that you have accomplished. the hints and tips is very worthwhile together with it definitely response a lot of doubts regarding me. for my part, I’m not really truly appreciate the type of the write.
Thank you so substantially for this! I have not been this moved by a submit for rather some time! You’ve got it, what ever that means in running a blog. Properly, Youre certainly somebody that has something to say that persons should listen to. Keep up the good work. Maintain on inspiring the people today What ever “you’ve acquired it” means in blogging, I’ve it, apparently!
Attractive section of content. I just stumbled upon your web site and in accession capital to assert that I get in fact enjoyed account your blog posts. Any way I’ll be subscribing to your feeds and even I achievement you access consistently quickly.
Hiya, Superb Blog article! I have just retweeted this post to my readers.
The very root of your writing while sounding agreeable at first, did not really work very well with me after some time. Somewhere throughout the paragraphs you actually managed to make me a believer unfortunately only for a very short while. I still have a problem with your leaps in assumptions and you might do nicely to help fill in those breaks. In the event that you can accomplish that, I will surely end up being impressed.
I do enjoy the manner in which you have presented this particular problem plus it does give me a lot of fodder for thought. On the other hand, through just what I have witnessed, I just simply hope as the actual opinions stack on that people stay on point and don’t start upon a soap box of some other news of the day. Still, thank you for this superb piece and while I can not really agree with this in totality, I regard the perspective.
Hi there,I spend time digesting your reportage, I need to to be able to a tiny little thoughts to match you and want which you smart continuation. Most the most beneficial for all a person’s blogging and site-building reflexion.
Hey there,I love looking at your guide, Needed to publish a trifle review in order to you together with need that you a beneficial extension. Many one of the best for all ones own running a blog http://tinyurl.com/3j7o4mo
I’m not that much of a online reader to be honest but your sites really nice, keep it up! I’ll go ahead and bookmark your site to come back later on. All the best
You can definitely see your expertise in the work you write. The world hopes for even more passionate writers like you who are not afraid to say how they believe. Always follow your heart.
Incredible! This blog looks just like my old one! It’s on a totally different topic but it has pretty much the same layout and design. Wonderful choice of colors!
Your article is very interesting. Thanks.
search engine ranking software seo elite backlink service high pr backlinks
Thanks
While AKISMET blocks a lot of people who use bots to auto-post, it also blocks a lot of legitimate people who post. I am posting on this blog post by hand. I am not using a bot. I post on many blogs every day and AKISMET doesn’t like that. They block legitimate people. The Growmap Anti Spambot Plugin works much better. It stops the bots dead in their tracks as it uses Javascript to validate the post. I would also recommend installing the CommentLuv plug-in to reward people who take the time to comment. When people post legitimate comments, that adds value to your blog.
another comment for advertisment… ok…. go ahead… I’ll kill myself again If I received same advertisement messages from you 😛
This design is incredible! You certainly know how to keep a reader entertained. Between your wit and your videos, I was almost moved to start my own blog (well, almost…HaHa!) Wonderful job. I really loved what you had to say, and more than that, how you presented it. Too cool!
Hi, adore your site..please do research out my internet site at conditions and escape from your comment. thanks
Thanks Gavin! really appreciated
thank you for your article,My problem has been resolved.
Awesome…….. Something I did for someone… Its good to hear that…… Thank you for your comment
It is difficult to discover educated males and females on this topic, but you appear like you recognize anything at all you could be speaking about! Thanks
oh… thanks..
Hi there outstanding website! Does running a blog like this take a massive amount work? I’ve absolutely no knowledge of computer programming but I was hoping to start my own blog soon. Anyway, if you have any suggestions or tips for new blog owners please share. I understand this is off topic nevertheless I simply wanted to ask. Cheers!
Thanks really appreciated
Hi and a large number of thanks for that comment you even now left on my blog, i’ve also bookmarked your online internet site and may return as i uncovered the details inside of your online page much like a pretty good supply to my pretty own pup regards Eddie
Thank you Daniel, really appreciated
thank you for your article,My problem has been resolved.