Matte styles are big business in the design industry – from architecture to concept painting cinematic visions, these images bring to life imaginations on the grandest scale.

Transgressing the boundaries into web design, these styles are creating a greater environment for your work. There are no limits, allowing you to construct your own unique experiences. In this tutorial we explore this style and its potential, with the help from its main tool of production – Photoshop. This delivers a gamut of tools and option sets, tailored for a project such as this. Here we’ll explore the potential of integrated photo stock, complemented with options such as layer masks, blending modes, layer palette options and colour adjustment options. We’ll also show you how to create individual elements – from skylines to cityscapes. Manual lighting effects are also explored and add to a process that will let you understand and produce your very own matte backgrounds just like the big studios.
tools | tech | trends: Adobe Photoshop – Layer Masks, Blending Modes, Colour Adjustments, Pen Path, Gradient Overlay, Dodge and Burn tools, Smart Sharpen Filter
expert: Adam Smith
Tutorial files:
CSS Style switching
jQTouch
FontSquirrel
Matte backgrounds
WordPress themes
Template Design
01. Sketch ideas

Your image will require strong depth of field (DOF) effects, so it needs to be split into background, middle ground, foreground. Best effects will usher the eye to the image focal point (usually in the middle ground), so keep your foreground as simple as possible and backgrounds as your light source.
02. Resourcing stock

Open up a file at the size 1024px by 768px, at 300dpi, RGB. Scour the net for available resources you can purchase or are royalty free. Alternatively, use the royalty-free resources that are supplied on the disc.
03. Introducing background

Begin by constructing the background. This will determine your lighting. Open the Alaskan sunset by Lisa.jpg and select the sea only, Copy>Paste it into your document. Select Edit>Transform>Flip Horizontal, placing it where you want. Open the Great sunset shot.jpg.
04. Second sky

Copy, paste and orientate your skyline from the Great sunset shot.jpg, matching it to light fall in your sea layer. Open and Copy>Paste in Eveningsky.tif skyline. Increase scale, placing to the right of your skyline, matching sunlight areas once more. Set an Overlay Blending mode, 60% Opacity and apply a layer mask, erasing noticeable edges.
05. Blending layers

Fill your background with orange (#ffaa0c) and decrease your first sky layer to 80%. Apply a 60% Overlay Blending mode to your second sky layer, decreasing Saturation to -100. Apply an orange-to-transparent layer style to your sea layer. Set Blend to Hard Light, Opacity at 20%, Angle at -90-degrees and Scale at 56%.
06. Photo filter

Apply a Deep Yellow Photo Filter from the Layers palette. Create new fill or adjustment layer
drop options, at 50% Density. Next, from the same options, apply a Hue/Saturation layer, set to Colorize, Hue at 175, Saturation at 4 and Lightness at -35. Apply a Multiply Blending mode and apply a soft-edged black brush to set layer mask, eking through exposures, leaving borders in shadow (as shown in the screenshot below).
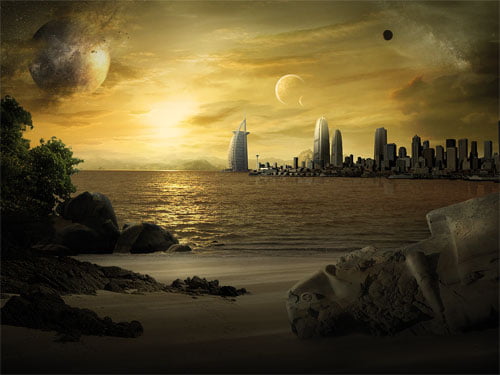
07. Introducing planets

Open the 948573_45038586.jpg (www.sxc.hu), using the Elliptical Marquee tool, set at 2px Feather, to select your planet – Copy>Paste into your image. Descale this planet layer, applying a Screen Blending mode. Use a layer mask to blend edges into the skyline. Open 1197175_45043198.jpg (www.sxc.hu), Copy>Paste> Descale the small planet into your scene as before, no blending mode this time.
08. Shoreline

After following the technique boxout, continue by opening 1269426_80856669.jpg, and make a selection of the sand, copy and pasting and editing from in your image. Open 1272216_33256011.jpg and Cut>Paste a section of where sea meets sand into your image.
09.Colour tweaks

Blend these two layer together by applying a layer mask to the sea layer, tweaking tones and dropping Opacity to 90%. Open 1305771_58743580.jpg and select the Channel palette, hiding all but Blue. Ctrl/Cmd+click this selecting Duplicate. Activate this duplicate and select Image>Adjustments>Levels.
10. Channel palette cut-out

Increase the highlight slider until the background bleeds white. Ctrl/Cmd+Shift+I, inverting, then Ctrl/Cmd+click the thumbnail. Reactivate your RGB Channel then your Layers palette, Copy>Pasting into your image. Rescale and edit edges using layer masks, and fixing colour shifts using a Desaturate Sponge tool.
11. Populate your image

Using these techniques, and using Pen Path selections, Copy>Paste in more foreground elements. As the background is your focal light, the foreground will be a lot darker. Creating this effect is simple. Begin by creating a new layer at the top of your stack, and select a black to transparent gradient style.
12. Gradient shadows

13. Cityscapes

14. Uniform colour and lighting

To create water reflection, duplicate this layer, horizontally flip it, and decrease Opacity to 30%. Paste in several building elements using the images on the CD. Apply black-to-yellow Gradient Overlays, varying option values, keeping Multiply Blend modes.
15. Finishing touches

Include misty mountains in the background. Copy>Paste in iStock 000000578525 and place behind your sky and sea layers. Apply a black-to-white Gradient Overlay, Blend Mode set to Hard Light, Angle at 90˚. Apply a layer mask and erase edges, before merging all and applying a final Smart Sharpen filter.
More Photoshop Tutorials
- How to Monetize Your Facebook Page: A Comprehensive Guide - July 22, 2023
- Avoiding Plagiarism: Your Ticket to Originality and Academic Success! - July 21, 2023
- Chat-GPT: Your Friendly AI Pal for Awesome Conversations! - July 20, 2023
Easy tweaks and understandable… will come back soon to view new tutorials
Good techniques
more matte-style tutorials required specially for website templates
Hello there, Fantastic Blog article! I have just retweeted this particular article to my fans.
Oh gosh, I disagree, but, nonetheless, it’s an interesting experience, RRS subscribed!